
Category: Tutorials
How to Upskill Employees: A Comprehensive Guide

Knowing how to upskill employees is essential for organizations in today’s rapidly evolving job market. Upskilling employees—enhancing and reskilling their existing skills in new competencies—is crucial for creating a dynamic and adaptable team. This article explores practical methods for upskilling employees, the benefits of upskilling initiatives, and how LearnKey’s Upskill Academy can help companies achieve these goals efficiently.
Reskilling and Upskilling of Employees
Understanding how to upskill employees involves focusing on both upskilling and reskilling. Reskilling refers to training employees to take on new roles and adapting to technological advancements or changes in business strategy. By learning how to upskill employees through reskilling, companies ensure that their workforce remains competent and ready to handle new challenges. For instance, as automation transforms certain job functions, reskilling enables employees to transition into roles that require uniquely human skills, such as creative problem-solving.
Upskilling and reskilling are responses to change and disruption, which could not be more evident than the consensus among the HR professionals surveyed in a Bridge-sponsored report: “The Future of Upskilling and Employee Learning 2024.” 95% of respondents agree that market forces or tech trends will disrupt jobs over the next two years. For almost half of those respondents, the disruptions are set to impact 41% of job roles.
Upskilling, another approach to learning how to upskill employees, enhances employees’ existing skill sets to improve performance in their current roles. By upskilling employees, organizations boost productivity and foster a culture of continuous professional growth. Knowing how to upskill employees in this way builds their expertise while simultaneously addressing skills gaps within the organization, which reduces external hiring costs. Engaged, upskilled employees are more likely to feel valued and committed, leading to better retention and job satisfaction.
Both reskilling and upskilling are critical components of understanding how to upskill employees effectively. When companies know how to upskill employees strategically, they can leverage their talent pool to maintain a robust and capable workforce. This proactive approach fills skills gaps and strengthens employee morale, as individuals who are given opportunities to grow will feel more fulfilled and engaged.
Employee Upskilling Playbook
A practical upskilling playbook provides a structured approach to understanding how to upskill employees and maximize the benefits of these initiatives. Knowing how to upskill employees starts with a plan that includes assessing current skills, identifying gaps, and developing targeted training programs.
Assessing Current Skills: To learn how to upskill employees, evaluate your team’s competencies through performance reviews and skills assessments. This step is essential to understanding the existing skill landscape.
Identifying Skills Gaps: Knowing how to upskill employees involves comparing needed skills with current capabilities. By identifying these gaps, companies can pinpoint where upskilling is required to achieve organizational goals.
Developing Training Programs: The next step to upskill employees is creating training programs that address specific skills gaps. These may include online courses, workshops, or mentorship programs, all customized for effective learning.
Implementation and Monitoring: Implementing and tracking progress is vital to upskilling employees effectively. Regular assessments ensure employees can apply their new skills.
Evaluation and Feedback: A well-rounded approach to upskilling employees includes evaluating the training’s impact on job performance. Feedback helps refine future upskilling efforts.
This upskilling playbook guides understanding how to upskill employees systematically, ensuring they acquire valuable skills that benefit both them and the organization.
Upskilling Employees for Growth
Knowing how to upskill employees is a strategic move that benefits organizations and their staff alike. For employees, learning how to upskill employees enhances expertise and competence, which translates into better performance. Companies that invest in upskilling employees enjoy increased productivity and innovation as their teams can address complex challenges more effectively.
When learning how to upskill employees, it is important to remember that it boosts job satisfaction and engagement. Employees who receive development opportunities feel valued and are more loyal to their employers. Implementing a strategy to upskill employees also supports a positive work culture, making the organization more attractive to top talent and reducing turnover rates.
A practical approach to upskilling employees strengthens individual and organizational growth. Employees grow professionally, which leads to a more skilled workforce. By mastering how to upskill employees with a focus on advanced skills, companies ensure they can meet evolving business needs without resorting to costly external hiring.
How Upskilling and Reskilling Help Employees Avoid Job Loss
Learning how to upskill employees is especially crucial in an era of rapid technological advancements and economic changes. When companies know how to upskill and reskill employees, they help employees adapt to shifting job demands, reducing the risk of job loss. A practical approach to upskilling employees allows them to remain versatile and valuable to the organization.
Employees who understand how to upskill employees are equipped to shift roles or take on new responsibilities as their roles evolve. As automation replaces some tasks, those who know how to upskill employees can transition into areas less affected by automation. Companies build a resilient workforce that can navigate industry changes by learning how to upskill employees and reskill them in fields like data analysis or project management.
Organizations that know how to upskill employees gain a strategic advantage. By fostering a culture of adaptability through upskilling and reskilling, businesses retain valuable talent and enhance their capacity to handle market disruptions. Ultimately, understanding how to upskill and reskill employees protects careers and sustains company success.
LearnKey’s Upskill Academy
LearnKey’s Upskill Academy is a prime example of a practical approach to understanding how to upskill employees. The academy provides targeted programs to help professionals “Get Upskilled” or “Get Certified” in 90 days or less. Learning how to upskill employees through programs like LearnKey ensures that individuals can acquire new skills quickly and immediately put them to use.
LearnKey’s Upskill Academy offers a variety of training programs that teach how to upskill employees across different fields:
Business & Administrative Support: LearnKey offers upskilling in accounting, finance, administrative support, customer experience, and entrepreneurship. These programs equip employees with the skills to succeed in today’s fast-paced business world.
Cybersecurity: LearnKey teaches employees how to upskill in cybersecurity, covering areas like ethical hacking, network defense, and forensic analysis. As cybersecurity threats increase, these skills are essential for protecting company data.
Design & Media Production: LearnKey demonstrates how to upskill employees in Adobe software, video production, and visual communication, empowering creative professionals to enhance their skills.
Information Technology: LearnKey offers courses in Microsoft Office, database management, and software development to upskill employees in IT, a field that demands continuous learning.
Leadership & Management: LearnKey offers programs in team leadership and communication That explain how to upskill employees into roles with greater responsibility and influence within the company.
By following LearnKey’s model of upskilling employees, companies can create a highly skilled, adaptable workforce that aligns with their business goals. LearnKey’s Upskill Academy helps businesses succeed by providing accessible, high-quality training that meets the demands of today’s evolving work environment.
Adobe Premiere Pro How to Crop Video

Learning how to crop video in Adobe Premiere Pro is an essential skill when creating professional video content. Cropping allows you to focus on specific elements, eliminate distractions, and improve the overall composition of your videos. This guide will show you the steps for cropping videos in Adobe Premiere Pro while also introducing you to the comprehensive Adobe Premiere Pro 2024 course offered by LearnKey. Whether you’re a beginner or looking to advance your skills, this course has everything you need to succeed in the digital video industry.
Understanding How to Crop Video in Adobe Premiere Pro
Adobe Premiere Pro is a powerful tool with many features that can elevate your video editing skills. Cropping is one of the most used techniques for enhancing your content. Here’s a quick breakdown of the steps involved:
- Import Your Footage: Import the video you want to crop into Adobe Premiere Pro. Then, drag the footage into your timeline to begin editing.
- Access the Effects Panel: Go to the “Effects” panel and search for the “Crop” effect. Drag this effect onto the clip in your timeline.
- Adjust Crop Settings: Navigate to the “Effect Controls” panel, where you can crop the top, bottom, left, and right sides of your video. Adjust these settings as needed to achieve your desired framing.
- Fine-tune with Keyframes: Use keyframes to animate the crop, creating dynamic effects such as zooms or gradual cropping over time.
- Export Your Video: Once satisfied with your cropped video, export it using the appropriate settings for your intended platform.
These steps offer a basic overview of how to crop video in Adobe Premiere Pro. However, mastering this and other video editing techniques takes practice and a structured learning approach, which is precisely what LearnKey’s Adobe Premiere Pro 2024 course provides.
Course Overview: Adobe Premiere Pro 2024
LearnKey’s Adobe Premiere Pro 2024 course is a comprehensive program that covers everything you need to know about working in digital video. Spanning 5 hours, 59 minutes, and 43 seconds across five in-depth modules, the course is designed to equip beginners and advanced users with the necessary skills.
Taught by Emmy award-winning video editor and Adobe Certified Professional Aaron Colburn, this course prepares you for the Adobe Certified Professional exam. It boosts your employability in the digital video industry. Let’s explore what each module covers:
Module 1: Working in the Video Industry
The first module introduces the basics of working in the video industry, from understanding your target audience to mastering key terminology. You’ll learn about format requirements, design plan communication, and intellectual property rights, all critical aspects of professional video production.
- Lessons Include:
- Purpose, Audience, and Audience Needs
- Format Requirements
- Design Plan Communication
- IP, Permissions, and Licensing
- Understanding Key Terminology
- Principles and Best Practices
- Photographic and Cinematic Principles
Each lesson is structured to build foundational knowledge, setting the stage for more advanced techniques later in the course.
Module 2: Project Setup and Interface
Efficient project setup is crucial in Adobe Premiere Pro. This module dives into creating projects and sequences, managing interfaces, and customizing workspaces for an optimized workflow. You’ll also learn how to import assets and work within the timeline.
- Key Topics:
- Create Projects and Sequences
- Interface and Panels
- Workspaces
- Preferences
- Using the Timeline
- Markers and Guides
- Importing Assets into a Project
- Essentials and Integration
- Working with Assets
By the end of this module, you’ll have a solid understanding of managing complex projects effectively.
Module 3: Organizing Video Projects
Good organization is the backbone of professional video editing. In this module, you’ll learn how to manage tracks, sequences, and multi-cam setups, ensuring your projects remain structured and easy to navigate.
- Lessons Include:
- Managing Tracks
- Managing Sequences
- Managing Multi-Cam Sequences
- Enabling and Disabling Track Output
The skills learned in this module are essential for maintaining efficiency, especially when working on large-scale projects.
Module 4: Creating and Modifying Visual Elements
This is where the core of video editing happens. In addition to learning how to crop video, you’ll explore tools and techniques for adding effects, managing audio, and enhancing visual elements. This module is packed with practical lessons that can be directly applied to real-world projects.
- Key Lessons:
- Core Tools and Features for Editing
- Adding and Animating Titles
- Text Formats
- Transforming Footage
- Transforming Digital Media
- Transforming Audio
- Using Effects to Modify Video
- Applying Effects Presets
- Effects on Multiple Clips
- Using Tracks for Composites
- Using Keyframes
- Managing Audio
- Audio Effects and Transitions
Mastering these skills will improve video quality and increase efficiency when working on demanding projects.
Module 5: Publishing Digital Media
After completing your video edits, the final step is preparing your content for distribution. This module covers everything you need to know about exporting, rendering, and archiving your digital media for various platforms.
- Topics Covered:
- Preparing Sequences for Publishing
- Exporting Sequences
- Rendering and Archiving
By the end of this module, you’ll be equipped to deliver high-quality content that meets industry standards.
Why Choose LearnKey ‘s Adobe Premiere Pro 2024 Course?
LearnKey’s mission is to Improve Employability Every Day. This Adobe Premiere Pro course is designed to teach you the fundamentals of video editing and prepare you for real-world challenges. Whether you aim to pass the Adobe Certified Professional exam or want to elevate your video editing skills, this course has you covered.
With expert instruction from Aaron Colburn, you’re learning from one of the best in the industry. Aaron brings over 20 years of experience as an Emmy award-winning video editor and Adobe Certified Professional, ensuring you receive top-tier training.
Enroll Today
Ready to master cropping and other advanced video editing techniques in Adobe Premiere Pro? Enroll in LearnKey’s Adobe Premiere Pro 2024 course today at ENROLL HERE. For just $99, you’ll gain access to this comprehensive course for an entire year, helping you enhance your skills and advance your career.
Conclusion
Learning how to crop video is just the beginning of what you can achieve with Adobe Premiere Pro. With LearnKey’s Adobe Premiere Pro 2024 course, you’ll gain a deep understanding of the basics and advanced techniques, setting you up for success in the competitive world of digital video production. Don’t miss this opportunity to take your video editing skills to the next level.
FLVs and Creative Cloud 2014
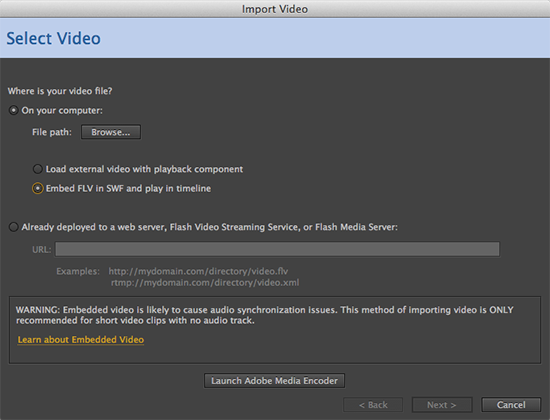
Last week, Adobe released an update to their Creative Cloud software. A major change from previous versions of Adobe’s software is now they have removed the ability to encode video into the FLV and F4V formats.
Yes, you read that right. After Effects CC 2014, Premiere Pro CC 2014, and Media Encoder CC 2014 can no longer export video to the FLV or F4V formats.
Interestingly enough, Flash CC 2014 can still import FLV video. Those who use embedded video in Flash can still import video as usual, but Adobe no longer provides the tools to create those videos.
Luckily, there are many other tools out there to do the job. A quick Google search will bring up a myriad of websites and free tools for converting video to FLV.
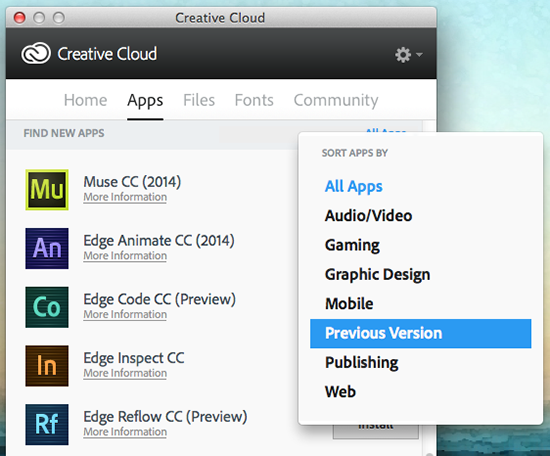
Another option is to keep older versions of Media Encoder and After Effects installed alongside your CC 2014 versions. If you’re like me and have already uninstalled your earlier versions of the Adobe software, there is still hope. From the Creative Cloud panel, you can install CC 2014, CC, and CS6 versions of the software, so simply reinstall an older version of the program you need.
Under the Apps tab, scroll down to the Find New Apps section and change ‘All Apps’ to ‘Previous Version.’
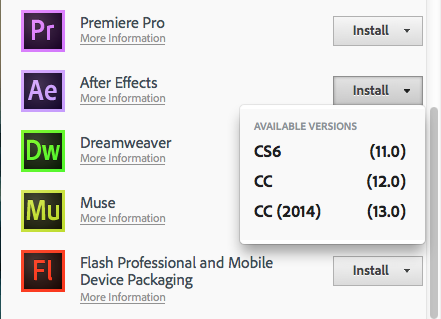
Click the Install button next to the desired software and you will see a dropdown giving you the option to install CS6, CC, or CC 2014. Select the option you want, and once the software is installed you should be back in business.
LK Designer by Day…Illustrator by Night

I joined the Design Team at Learnkey in 2009, and in doing so, I like to feel that I brought a new and unique approach the team. You see, although I work as a Designer that would be a secondary definition to my artistic strengths. I am primarily an Illustrator, and even more specifically a Comic-book Illustrator.
Comic books, graphic novels, comic strips, and the like are some of the best ways to tell a story in my opinion. Comics go beyond words on a page, and in some respects go beyond some of the limitations of film-making. It is a unique and treasured storytelling medium to me and to many others! I have illustrated many small comic books as personal projects, and have been commissioned to do illustrations for clients. You can check out samples of those works here at my personal website.
Web Browsing Tips – Tab Groups
Personally, I usually use Chrome for the majority of my web browsing. Being LearnKey’s webmaster though, I need to at least have a copy of the major browsers around to test things, and I recently installed an update to Firefox 5. Our graphic designer Kari pointed out a pretty cool and useful feature Firefox recently added to their updates – Tab Groups.
Say you’re working on a few different projects at once, and you don’t want to mix up the different tabs you have open between projects. You could open a new browser window and separate them that way, but Firefox’s Tab Groups feature lets you keep it all in one window, and switch between groups easily. It’s fairly similar to the Spaces feature in Mac OS X.
Web Browsing Tips – Disable Compatibility View
When you work with websites for a living, you tend to pick up on the different quirks of all the web browsers. You know which ones have trouble with spacing, or which ones work better with certain Flash objects, and so on. For most people who don’t live their lives inside a web browser, it can be confusing – and that’s why we’re here to help!
Internet Explorer 8 and 9: “Compatibility View”
At first glance, you may see Compatibility View and feel the need to turn it on, or else your web experience might be glitchy and broken. That may have possibly been the case when IE8 was first released, but these days it does the exact opposite. To understand what I mean, there’s a few things about Internet Explorer you need to know.
Continue reading “Web Browsing Tips – Disable Compatibility View”
Learn “Little Known Windows 7 Shortcuts” with Expert Tom Carpenter

Here at LearnKey, when we say the people who present our training courses are experts, we mean exactly that. We don’t find some random guy on the street who can read from a cue card, we find people who really know their stuff and are considered experts in their various fields. When they provide us with tips, we listen!
Tom Carpenter has been an expert for LearnKey in a variety of different courses, and since he also has his own blog with tidbits of information, we thought we’d showcase some tips from the source himself. In his post Little Known Windows 7 Shortcuts, he showcases…well, little known Windows 7 shortcuts. These tips will make using Windows 7 much faster and more efficient. Plus you can show off to your co-workers and look like you are a Windows 7 expert yourself! Check out his blog and enjoy!
Working With Programs: Start-up Folder

Once you have the programs you want installed, and the programs you don’t want uninstalled, you may want certain programs to start up immediately when you boot your computer. That’s where we come in! Ammon Wiese shows you how to tell Windows 7 which programs to boot at start up in the video below.
Working With Programs: Removing Programs
We’ve shown you how to install programs, but what if you want to remove programs already installed? Ammon Wiese shows you how in this next installment of our Windows 7 training clips!
Expose Yourself to Flash: Creating 3D Text

Sure, creating a bouncing ball and adding effects to make it look more realistic are cool and all, but what if you want to create 3D text? Have no fear, LearnKey’s Brad Washburn will show you how to do that in this next installment of Flash tutorials!
Continue reading “Expose Yourself to Flash: Creating 3D Text”